
When you look at a professional builder's custom kit on Instagram, you'll often wonder, "Why does their kit look so much more detailed than mine?" The secret is usually Scribing—the art of carving entirely new panel lines into the plastic.
The Tools You Need
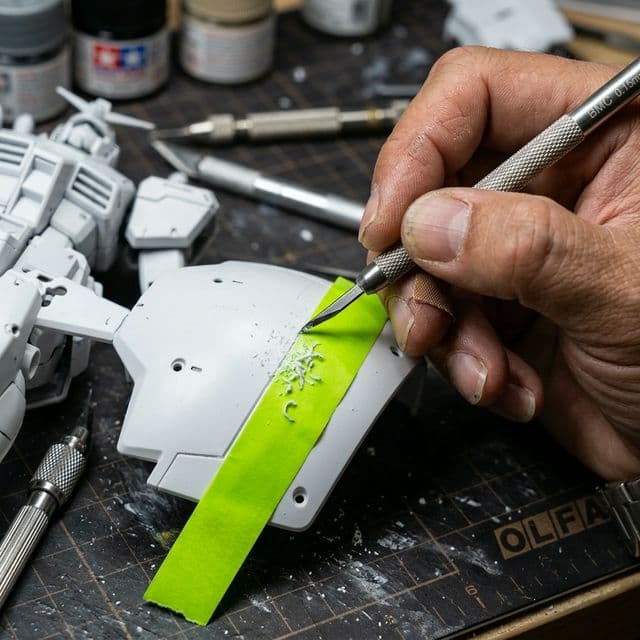
Do not use a hobby knife! A hobby knife slices a V-shape into the plastic, which creates raised walls on the edges. You need a dedicated Scribing Chisel (like BMC or MADworks chisels) which scrape out a microscopic, perfect U-shaped trench. Typical widths are 0.15mm to 0.2mm for 1/144 kits.You also absolutely need Scribing Guide Tape. This is a thick, rigid plastic tape that won't flex or yield when you run a sharp metal chisel along its edge.
The Technique
- Draw your desired design on the bare plastic using a mechanical pencil.
- Apply the scribing tape directly over your pencil line, leaving the edge of the tape exactly where you want to carve.
- Lightly, with zero downward pressure, drag the chisel backward against the tape edge. The weight of the tool alone should do the work.
- Repeat this gentle drag 10 to 15 times until a clean, uniform trench is created.
- If the plastic shavings get stuck, clean the line using a stiff toothbrush.
Related Dispatches
How to Safely Remove Nub Marks Without Damaging Plastic
Say goodbye to ugly white stress marks! Master the double-cut method and glass file techniques for flawlessly clean armor pieces.
Building Your First Custom Diorama for Gunpla
Bring your models to life by creating realistic battleground dioramas using foam, basic paints, and household materials.
Panel Lining Techniques: Achieving that Pro Finish
The fastest way to make a plastic model look like a real machine. Learn the fundamental techniques of panel lining using fine-tip markers and pour-type washes.